Any hints about what to do with the ubiqutous front bumper sag i.e. that the rear (wheelhouse) edge of the front bumper is just not high enough/filling the gap it should fill? I know there are only 6 connectors to get it off, but maybe someone has solved this one already. Sorry if I am raising a hoary old one but I am new to the site and haven't found the search function yet.
Mike, Karlstad, Sweden lhd 4706 14RE
Front bumper sag
-
Mike Holdstock
- Confirmed BX'er
- Posts: 72
- Joined: Sat Jul 25, 2009 10:12 pm
- Location: Karlstad, Sweden
- My Cars: C3 1, 2003, just over 100000km @20240724 - runabout
BX 19TR I1990, also low mileage ie about 110000km - vintage and still >SO comfortable!.
-
Tim Leech

- Over 2k
- Posts: 15629
- Joined: Tue Apr 15, 2008 11:12 am
- Location: Derbyshire
- My Cars: Various
- x 178
Mike it sounds as if your bumper has come off its wing mountings, you need to undo the 6 torx screws on the bumper, 3 at the top and 3 at the bottom.
Slide the bumper forward, there should be a plastic square shaped locater that is attached to inner side of the bumper (one each side) with a square lug on it sticing out, these should locate into a hole on each wing which is normally hidde from view, line these up (get someone to help you) and refit the bumper and hopefully it should sit level!.
Slide the bumper forward, there should be a plastic square shaped locater that is attached to inner side of the bumper (one each side) with a square lug on it sticing out, these should locate into a hole on each wing which is normally hidde from view, line these up (get someone to help you) and refit the bumper and hopefully it should sit level!.
Lots of Motors, mostly semi broken....


-
Tim Leech
- Over 2k
- Posts: 15629
- Joined: Tue Apr 15, 2008 11:12 am
- Location: Derbyshire
- My Cars: Various
- x 178
Ive always found to get them far enough forward you have to undo them, which makes the job a whole lot easier.Vanny wrote:or, pull it forward (in direction of normal travel of the car) a little, push up, in and back. Saves undoing the screws and can be done rather quickly!
Lots of Motors, mostly semi broken....
-
Mike Holdstock
- Confirmed BX'er
- Posts: 72
- Joined: Sat Jul 25, 2009 10:12 pm
- Location: Karlstad, Sweden
- My Cars: C3 1, 2003, just over 100000km @20240724 - runabout
BX 19TR I1990, also low mileage ie about 110000km - vintage and still >SO comfortable!.
Thanks!
Vanny and Roverman (in no particular order9
Thanks for your generous advice. I'll find out how strong I am this evening when I get down to it.
Two more questions to enquire into yopur mental strength:
I notice that there is some trunking lying on the top edge (behind some clips which are a part of the bumper moulding) which carry (amongst other things) power supply to the fan. Does this have to be pulled out of the way or, in your experience, is there enough loose on this cable/trunk to let it stay in place/it will follow when you dismount the bumper?
Also - last one - any experience of how to handle the pipe from the headlamp washer tank (situated under and in front of the LHM reservoir) to the washer outlets on the balck lumps on the bumper?
(Or is this a purtely Scaninavian modification?).
Mike
-
Tim Leech
- Over 2k
- Posts: 15629
- Joined: Tue Apr 15, 2008 11:12 am
- Location: Derbyshire
- My Cars: Various
- x 178
-
RxBX
- Over 2k
- Posts: 2241
- Joined: Wed Jan 28, 2009 11:51 am
- Location: DERBYSHIRE
- x 1
Re: Thanks!
Welcome Mike !
But there is a member on the Forum that does have them fitted to there BX :-
:-

As already stated by 'Vanny' I'd normally do it the same way for speed and ease !
Especially with all the extra feed pipes etc which go to the headlamp wash I would NOT start removing the whole bumper as you may able just to feel where the bracket/ mounts are fitted.
However if you can't just clip the bumper back into place it may be easier just to remove the inner wheel arch liner !
This is provided the inner wing mounting bolt on the wing adjacent to the top trailing edge of the bumper is not rusted/seized up which supports the liner at that point !
With the wheel arch liner removed this should then enable you to see and access the side square bumper mountings (Item 6 in the parts listing/catalog below) for easier alignment/re-attachment of the bumper which in turn is attached to inner wing/arch surface .
Make sure the bracket is correctly fitted in the mounting slot on the body work of the car and locked back into the correct position first.
Then make sure the clip/tangs are correctly aligned with the moulded fastening/edges on the inside of the bumper and give the bumper a hard push towards the mounting brackets to click it into place !
After re-mounting the bumper to the brackets refit the wheel arch liner to the vehicle.
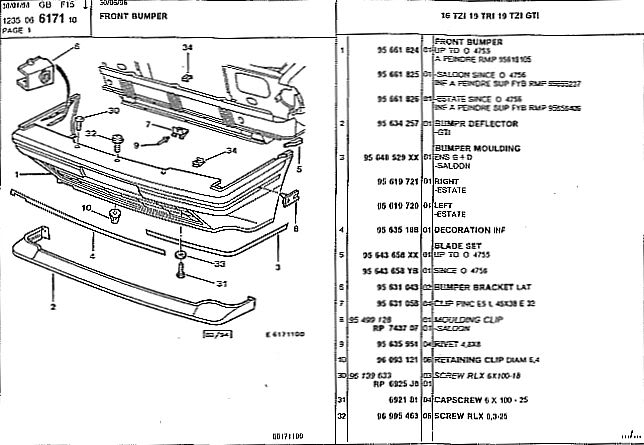
Image/courtesy of 'DLM' from THIS thread, I hope this is of help Mike.
Mike that it correct for the Headlamp wash it is not a standard fitment for the UK Market !Mike Holdstock wrote:Also - last one - any experience of how to handle the pipe from the headlamp washer tank (situated under and in front of the LHM reservoir) to the washer outlets on the back lumps on the bumper?
(Or is this a purely Scandinavian modification?).
Mike
But there is a member on the Forum that does have them fitted to there BX
As already stated by 'Vanny' I'd normally do it the same way for speed and ease !
Especially with all the extra feed pipes etc which go to the headlamp wash I would NOT start removing the whole bumper as you may able just to feel where the bracket/ mounts are fitted.
However if you can't just clip the bumper back into place it may be easier just to remove the inner wheel arch liner !
This is provided the inner wing mounting bolt on the wing adjacent to the top trailing edge of the bumper is not rusted/seized up which supports the liner at that point !
With the wheel arch liner removed this should then enable you to see and access the side square bumper mountings (Item 6 in the parts listing/catalog below) for easier alignment/re-attachment of the bumper which in turn is attached to inner wing/arch surface .
Make sure the bracket is correctly fitted in the mounting slot on the body work of the car and locked back into the correct position first.
Then make sure the clip/tangs are correctly aligned with the moulded fastening/edges on the inside of the bumper and give the bumper a hard push towards the mounting brackets to click it into place !
After re-mounting the bumper to the brackets refit the wheel arch liner to the vehicle.
Image/courtesy of 'DLM' from THIS thread, I hope this is of help Mike.
-
Mike Holdstock
- Confirmed BX'er
- Posts: 72
- Joined: Sat Jul 25, 2009 10:12 pm
- Location: Karlstad, Sweden
- My Cars: C3 1, 2003, just over 100000km @20240724 - runabout
BX 19TR I1990, also low mileage ie about 110000km - vintage and still >SO comfortable!.
more bumper sag
RxBX
Thanks - and my access point did become via the wheel arch liner. Things are looking a lot better now, and I also got to inspect the relatively little rust of ages in there, quite encouraging.
The clip accessed via the wheel arch liner the guys were referring to required no small amount of manipulation - there was no way it would just click in.
The top left bumper mount screw has been subjected to some abuse - bit os jagged metal and the plastic screw seating replaced with a clip for the screw to anchor into - so there may have been a minopr prang which has resulted in a faulty alignment somewhere. Tomorrow and more light I will have a go at the left wheel arch
You guessed right about the headlamp wash unit, my two are just as the illustration you sent. I haven't seen any Swedish units without these. This type of equipment was demanded in Sw from the lat 70's - I remember seeing an amazing solution that was created for a Morris something I had here then.
I tried the original solution - undo the six screws and pull it out, then realign, but came to the conclusion that either I am very weak or there was some other factor. The other factor could be 4 really man-size "locked metal clips" which appear to be holding the plastic bumper to the metal bar which extends across the front (of the fan etc). These 4 clips are visible from the outsideIn front of the car on the top level of the bumper skirt grill. Is this something that appears on the UK models too or is it something (my theory) that could have been demanded by the same Swedish registration authorities that demanded the washers - and as a way of firming up the bumper washer mounting?
Maybe i can tap your expertise since we are under the front wheel arches. Tom Sheppard has posted a great article "Grumpy front struts, easy cure" on the DIY section of this site, but I can not for the life of me see the two rubber pipes he refers to in "Fitted to the side of the strut are two rubber pipes. remove these, collapse the suspension to its lowest setting and place the ....." where are these pipes? In the engine compartment at the top or am I misinterpretting "strut"?
Many thanks to all
Mike in Sweden
OWNS a C3 1 1,6 which does the donkey work
OWNS a BX19i 1990 tri with only 110k km on the clock and no rust
HAD a life-threatened BX16i which is still alive
HAS HAD 89 BX14iRE (dead)
HAS HAD 88 BX19GtI (dead)
HAD 89 BX14RE which was still motoring very well at 280.000km when there was too much rust (gone)
HAD about 5 GS (first 1978) in the 70's, 80's and 90's, loved them, would dearly have one again.
HAD a DS Break - Succumbed to the rust of ages..
-
Mike Holdstock
- Confirmed BX'er
- Posts: 72
- Joined: Sat Jul 25, 2009 10:12 pm
- Location: Karlstad, Sweden
- My Cars: C3 1, 2003, just over 100000km @20240724 - runabout
BX 19TR I1990, also low mileage ie about 110000km - vintage and still >SO comfortable!.
BxRX
On closer examination of the diagram/parts list I think that the 4 mansize clips I referred to could be item 7 and 9.
So I will maybe just have to accept that I'm not that strong any more ;-)
Mike
On closer examination of the diagram/parts list I think that the 4 mansize clips I referred to could be item 7 and 9.
So I will maybe just have to accept that I'm not that strong any more ;-)
Mike
OWNS a C3 1 1,6 which does the donkey work
OWNS a BX19i 1990 tri with only 110k km on the clock and no rust
HAD a life-threatened BX16i which is still alive
HAS HAD 89 BX14iRE (dead)
HAS HAD 88 BX19GtI (dead)
HAD 89 BX14RE which was still motoring very well at 280.000km when there was too much rust (gone)
HAD about 5 GS (first 1978) in the 70's, 80's and 90's, loved them, would dearly have one again.
HAD a DS Break - Succumbed to the rust of ages..
OWNS a BX19i 1990 tri with only 110k km on the clock and no rust
HAD a life-threatened BX16i which is still alive
HAS HAD 89 BX14iRE (dead)
HAS HAD 88 BX19GtI (dead)
HAD 89 BX14RE which was still motoring very well at 280.000km when there was too much rust (gone)
HAD about 5 GS (first 1978) in the 70's, 80's and 90's, loved them, would dearly have one again.
HAD a DS Break - Succumbed to the rust of ages..
-
MULLEY

- Over 2k
- Posts: 8406
- Joined: Thu Jun 22, 2006 11:10 pm
- Location: Derbyshire
- My Cars: 1999 Xsara LX 2.0HDI (90) Hatch - Fern
2002 C5 2.0 HDI (110) Estate - Jasmine - SORN
2011 Mini Cooper D Clubman - SOLD
2016 Mercedes A180D Sport - Auto refinement
1992 TZD Turbo - Bluebell - SORN
1992 TZD Turbo Estate - SORN
1991 Gti 16V - Blaze - crash damaged, will get repaired - SORN
1990 Gti 8Valve SOLD - looks like it's been scrapped
2002 Mini Cooper S - SOLD - i miss this car
1992 TXD - Scrapped in March 2014
1988 CX 25 GTI Turbo2 - SORN
1996 - AX Memphis 1.5D - Dream - SORN - x 8
The strut is the vertical cylinder that runs from inside the engine bay where the sphere is attached, it runs through a hole into the wheel arch.
If you look in the wheel arch, you cant miss a dirty great big metal cylinder, thats the strut. On the strut are 2 rubber pipes that are attached via a clip towards the bottom of the strut which isnt veiwable when looking at it directly. If you peer around the strut, you will see the 2 rubber pipes connected upto some fixed metal pipes. The rubber pipes can be gently eased off the metal one's (they'll remain attached to the strut), these are then placed in a container of lhm where it then sucks up & spits out the lhm when raising the height of the car. Dont forget to secure the container of lhm to avoid it spilling everywhere & dont overfill either. Hope that explains it?
If you look in the wheel arch, you cant miss a dirty great big metal cylinder, thats the strut. On the strut are 2 rubber pipes that are attached via a clip towards the bottom of the strut which isnt veiwable when looking at it directly. If you peer around the strut, you will see the 2 rubber pipes connected upto some fixed metal pipes. The rubber pipes can be gently eased off the metal one's (they'll remain attached to the strut), these are then placed in a container of lhm where it then sucks up & spits out the lhm when raising the height of the car. Dont forget to secure the container of lhm to avoid it spilling everywhere & dont overfill either. Hope that explains it?
2002 C5 2.0 HDI Estate - Jasmine - Now SORN
2011 Mini Cooper D Clubman - SOLD
2016 Mercedes A180D Sport - Auto refinement
1992 TZD Turbo - Bluebell - My daily
1991 Gti 16V - Blaze - crash damaged, will get repaired.
1990 Gti 8Valve SOLD - looks like it's been scrapped
2002 Mini Cooper S - SOLD - i miss this car
1992 TXD - Scrapped in March 2014
1988 CX 25 GTI Turbo2 - SORN
1996 - AX Memphis 1.5D - Dream - SORN
I'm not just a username, i'm also called Matthew.
-
Mike Holdstock
- Confirmed BX'er
- Posts: 72
- Joined: Sat Jul 25, 2009 10:12 pm
- Location: Karlstad, Sweden
- My Cars: C3 1, 2003, just over 100000km @20240724 - runabout
BX 19TR I1990, also low mileage ie about 110000km - vintage and still >SO comfortable!.
Mulley
many thanks for the transparent clarification
Mike in Sweden
many thanks for the transparent clarification
Mike in Sweden
OWNS a C3 1 1,6 which does the donkey work
OWNS a BX19i 1990 tri with only 110k km on the clock and no rust
HAD a life-threatened BX16i which is still alive
HAS HAD 89 BX14iRE (dead)
HAS HAD 88 BX19GtI (dead)
HAD 89 BX14RE which was still motoring very well at 280.000km when there was too much rust (gone)
HAD about 5 GS (first 1978) in the 70's, 80's and 90's, loved them, would dearly have one again.
HAD a DS Break - Succumbed to the rust of ages..
OWNS a BX19i 1990 tri with only 110k km on the clock and no rust
HAD a life-threatened BX16i which is still alive
HAS HAD 89 BX14iRE (dead)
HAS HAD 88 BX19GtI (dead)
HAD 89 BX14RE which was still motoring very well at 280.000km when there was too much rust (gone)
HAD about 5 GS (first 1978) in the 70's, 80's and 90's, loved them, would dearly have one again.
HAD a DS Break - Succumbed to the rust of ages..
-
RxBX
- Over 2k
- Posts: 2241
- Joined: Wed Jan 28, 2009 11:51 am
- Location: DERBYSHIRE
- x 1
Mike !Mike Holdstock wrote:RxBX
Maybe i can tap your expertise since we are under the front wheel arches. Tom Sheppard has posted a great article "Grumpy front struts, easy cure" on the DIY section of this site, but I can not for the life of me see the two rubber pipes he refers to in "Fitted to the side of the strut are two rubber pipes. remove these, collapse the suspension to its lowest setting and place the ....." where are these pipes? In the engine compartment at the top or am I misinterpreting "strut"?
Many thanks to all
Mike in Sweden
Mulley has already explained about the LHM strut overflow/return and vent pipes !
But if you open up THIS pdf file you will see exactly what your looking for on 'Thumbnail #1 item 9 :- as depicted in the lower left diagram and upper right hand diagram.
Also if you take a look at Thumbnail #15 and the lower right hand photo shot you will see these two rubber pipes (overflow/return pipe #5 and vent pipe #6, Also do-not cross connect these on re connecting !) which are attached to a common rubber connecting block.
Mk1 BX's were like this using two nylon ferrule connector's (one for each pipe) in my opinion this was a better design as when the pipes split it was a 5 minute job to replace the piece of rubber pipe from the nylon connector across to the metal connector pipes on the inner wing.
Unlike the all in one complete rubber moulded block and pipes which are pain to change as was fitted to the MK2 BX's
The next time the pipe splits all that's needed is to keep some random rubber pipe sourced from the breakers yard off an Xantia or BX etc. say from some piping from the long lengths of return pipes etc. you can see going back to the LHM tank.
I have also used the rubber vacuum pipe from the carb to air filter box as fitted to Fix Or Repair Daily CVH engined Escort/Orions as these had a good length of straight thick-wall/small-bore rubber pipe fitted to them !
Both MK1 and MK2 BX's had the same stainless steel back plate and S/S strap which clamps the common rubber block to the strut (Which are fiddly to re-use with success so that's why the MK1 BX is a much better setup/design for these particular pipes) !
Also this LINK will give you an overview of the LHM fluid systems return/hose circuits (The overflow/return and vent pipes can be seen in the first diagram)
I hope this is of help to you Mike and maybe other forum members
-
Mike Holdstock
- Confirmed BX'er
- Posts: 72
- Joined: Sat Jul 25, 2009 10:12 pm
- Location: Karlstad, Sweden
- My Cars: C3 1, 2003, just over 100000km @20240724 - runabout
BX 19TR I1990, also low mileage ie about 110000km - vintage and still >SO comfortable!.
RxBX
Thank you for the detailed information which I know to be of use to me and I am sure will also be of use to others.
I am on a much faster learning curve than I had expected. Absorbing the input I have so far will keep me going for a good few days
Amongsth other things I note that you in the UK distinguish between BX Mk 1 and Mk 2. At which ORGA number did this changeover take place (my vehicles are 4333 (19th Sept 88) and 4706 (27th Sept 89)?
Is this Series 1/2 with ORGA break at 3522/July 1 1986 (or thereabouts), or something else?
Mike
OWNS a C3 1 1,6 which does the donkey work
OWNS a BX19i 1990 tri with only 110k km on the clock and no rust
HAD a life-threatened BX16i which is still alive
HAS HAD 89 BX14iRE (dead)
HAS HAD 88 BX19GtI (dead)
HAD 89 BX14RE which was still motoring very well at 280.000km when there was too much rust (gone)
HAD about 5 GS (first 1978) in the 70's, 80's and 90's, loved them, would dearly have one again.
HAD a DS Break - Succumbed to the rust of ages..
OWNS a BX19i 1990 tri with only 110k km on the clock and no rust
HAD a life-threatened BX16i which is still alive
HAS HAD 89 BX14iRE (dead)
HAS HAD 88 BX19GtI (dead)
HAD 89 BX14RE which was still motoring very well at 280.000km when there was too much rust (gone)
HAD about 5 GS (first 1978) in the 70's, 80's and 90's, loved them, would dearly have one again.
HAD a DS Break - Succumbed to the rust of ages..
-
MULLEY
- Over 2k
- Posts: 8406
- Joined: Thu Jun 22, 2006 11:10 pm
- Location: Derbyshire
- My Cars: 1999 Xsara LX 2.0HDI (90) Hatch - Fern
2002 C5 2.0 HDI (110) Estate - Jasmine - SORN
2011 Mini Cooper D Clubman - SOLD
2016 Mercedes A180D Sport - Auto refinement
1992 TZD Turbo - Bluebell - SORN
1992 TZD Turbo Estate - SORN
1991 Gti 16V - Blaze - crash damaged, will get repaired - SORN
1990 Gti 8Valve SOLD - looks like it's been scrapped
2002 Mini Cooper S - SOLD - i miss this car
1992 TXD - Scrapped in March 2014
1988 CX 25 GTI Turbo2 - SORN
1996 - AX Memphis 1.5D - Dream - SORN - x 8
I'm unsure about the orga numbers, but the easiest way to distinguish between the mk1 & mk2 is visually. Looking at the side of the car, the MK1 front indicator will be orange & it is cut into the panel, whereas the MK2's are flushly fitted at the front & dont go into the panel & arent orange.
Inside the car, mk1's have the lego brick style dash with revolving drum, except the MK1 GT which doesnt (see indicators above).
Hope the above clears that up for you, remembering not to get that mixed up with Phase1 & Phase 2 Gti 16V's only.
Inside the car, mk1's have the lego brick style dash with revolving drum, except the MK1 GT which doesnt (see indicators above).
Hope the above clears that up for you, remembering not to get that mixed up with Phase1 & Phase 2 Gti 16V's only.
2002 C5 2.0 HDI Estate - Jasmine - Now SORN
2011 Mini Cooper D Clubman - SOLD
2016 Mercedes A180D Sport - Auto refinement
1992 TZD Turbo - Bluebell - My daily
1991 Gti 16V - Blaze - crash damaged, will get repaired.
1990 Gti 8Valve SOLD - looks like it's been scrapped
2002 Mini Cooper S - SOLD - i miss this car
1992 TXD - Scrapped in March 2014
1988 CX 25 GTI Turbo2 - SORN
1996 - AX Memphis 1.5D - Dream - SORN
I'm not just a username, i'm also called Matthew.
2011 Mini Cooper D Clubman - SOLD
2016 Mercedes A180D Sport - Auto refinement
1992 TZD Turbo - Bluebell - My daily
1991 Gti 16V - Blaze - crash damaged, will get repaired.
1990 Gti 8Valve SOLD - looks like it's been scrapped
2002 Mini Cooper S - SOLD - i miss this car
1992 TXD - Scrapped in March 2014
1988 CX 25 GTI Turbo2 - SORN
1996 - AX Memphis 1.5D - Dream - SORN
I'm not just a username, i'm also called Matthew.